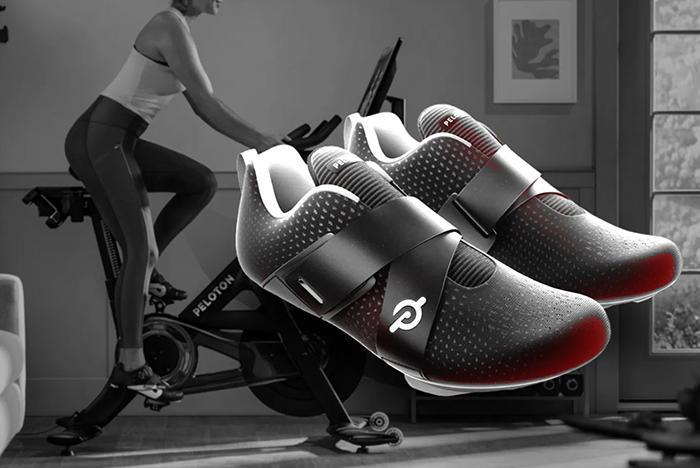
Welcome to the world of Peloton, where your fitness journey is taken to new heights thanks to state-of-the-art equipment and shoes designed for optimal performance.
If you’re new to Peloton or just trying out their specialized footwear for the first time, you might be wondering how exactly to put on those stylish yet functional Peloton shoes.
You Are Watching: How To Put On Peloton Shoes Updated 07/2024
Fear not, fellow cycling enthusiasts – this blog post will take you through a step-by-step guide on properly putting on and using your new kicks like a pro.
Types Of Peloton Shoes
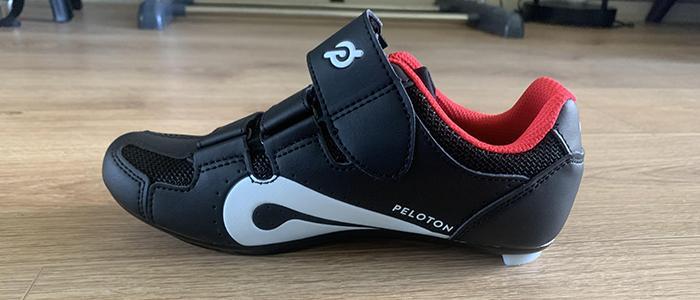
Standard Peloton Cycling Shoes
The standard Peloton cycling shoes are designed to offer optimal support and performance during your high-energy rides.
With a sleek, modern design, these shoes feature a lightweight synthetic upper for breathability and comfort.
One notable feature of these standard Peloton cycling shoes is their compatibility with Look Delta cleats, which makes them perfect for use with any Peloton bike.
Their rigid sole allows for efficient power transfer as you pedal away, boosting both your workout efficiency and overall experience.
Look Delta cleats can be easily attached using a 4mm hex key or 3mm Allen wrench according to the provided cleat installation guide.
Peloton Altos Cycling Shoes
Peloton Altos Cycling Shoes are a high-performance option for shoe lovers who prefer a more modern and sleek design.
With their unique zigzag single Velcro strap closure, these shoes provide a secure fit while also offering easy adjustability.
Not only do the Altos offer an enhanced level of comfort thanks to their Jacquard mesh material but they’re also designed with breathability in mind, keeping your feet cool and comfortable throughout even the most intense rides.
Compatible with Look Delta cleats like the standard Peloton cycling shoes, you’ll have no problem clipping into your Pedals and enjoying smooth rides on your fitness journey.
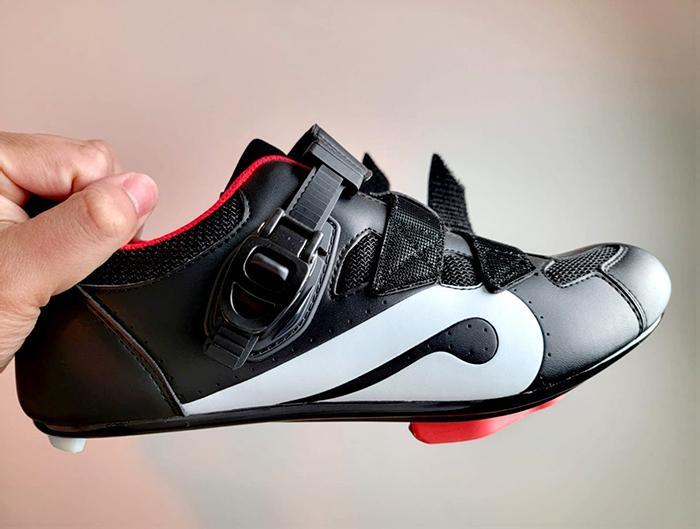
Attaching Cleats To Peloton Shoes
Attaching cleats to your Peloton shoes is an essential step for a secure and comfortable ride. Properly installed cleats ensure efficient power transfer and optimal foot positioning while cycling.
To attach Look Delta cleats to either standard or Altos Peloton cycling shoes, follow these simple steps:
- Collect the necessary tools: You will need a 4mm Allen wrench and the provided Look Delta cleats.
- Position the cleat: Place the cleat on the bottom of the shoe, with the triangular 3-hole mechanism facing forward and in line with the large toe area.
- Align the holes: Ensure that each hole on the shoe corresponds with a hole on the cleat.
- Insert screws: Using your 4mm Allen wrench, tighten each screw into place through both holes.
- Test for proper fit: With all screws secured, give a gentle tug on the cleat to ensure it’s snugly attached to your shoe.
Step-by-Step Guide To Putting On Peloton Shoes
Loosening Buckles And Unstrapping Velcro Closure
To begin putting on your Peloton shoes, you need to loosen any buckles or unstrap any Velcro closures.
If your shoes have buckles, look for the button located near them and press it down, so the buckle can be released.
For shoes with Velcro straps, simply pull the strap gently away from the shoe’s surface until it comes apart.
It’s important to ensure that you loosen these closures enough so that your foot can slide comfortably into the shoe.
Also, remember not to undo them too much since this can affect how securely attached your shoe is when clipped onto the bike’s pedals during cycling sessions.
Putting On The Shoes
Once you’ve loosened the buckles or unstrapped the Velcro closure, it’s time to slide your feet into your Peloton shoes.
Make sure that your foot placement is centered over the pedal axle so that you can clip in and out easily.
When putting on Peloton shoes, ensure that they feel comfortable while providing a secure fit for optimal power transfer.
Adjusting cleats is essential for comfortability when wearing Peloton cycling shoes. If the cleats are too tight or loose, this will affect how effectively they clip into their respective pedals.
Be careful not to overtighten your cleats as there should be some room left for adjustment after installation using a 4mm hex key wrench.
Adjustments can also be made using the buckle closure system provided with each pair of Peloton-compatible cycling shoes to suit individual preferences and provide additional support where necessary during exercise routines.
Keywords: Peloton, Shoes, Cleats, Power transfer, Toe cages, Comfortability , Installing cleats
Buckling Up Or Closing Peloton Shoes
Once you have put on your Peloton shoes, the next step is to buckle them up or close them. For standard Peloton cycling shoes, they typically come with three velcro straps and a buckle closure system for the top strap.
The Altos cycling shoes feature one zigzagged velcro strap that crosses over the shoe for its closure.
Many riders prefer to tighten the bottom two velcro straps first, followed by the top strap’s buckle closure system.
Properly securing your Peloton shoes will provide better power transfer from your feet to pedals while preventing any discomfort or injuries caused by loose-fitting footwear.
Clipping In And Out Of Peloton Pedals

How To Clip In
To clip into Peloton pedals, follow these steps:
- Stand across the bike with your dominant foot on the ground.
- Bring the pedal on your dominant side to the six o’clock position.
- Position your foot so that the cleat aligns with the pedal.
- Push down through the heel until you hear a clicking sound, indicating successful clipping in.
- Repeat with your non – dominant foot on the other pedal.
How To Clip Out
To clip out of Peloton pedals, use the following steps:
- Shift your weight to your non – dominant side while still pedaling.
- To unclip your right foot, kick your right heel outwards with force.
- To unclip your left foot, kick your left heel outwards with force.
- If you have difficulty unclipping, try releasing the tension in the pedals by using a 3mm Allen wrench to loosen the pedal tension screw on each pedal.
- Always ensure that you have properly clipped in before beginning a ride to prevent accidental disengagement while cycling.
Troubleshooting Common Issues
If you’re having trouble clipping in or out of your Peloton pedals, don’t worry – it can take some practice. Check out our step-by-step guide for tips, and if you’re still having issues, visit Peloton Support for assistance.
Difficulty Clipping In
If you’re having trouble clipping into your Peloton pedals, don’t give up just yet! Difficulty clipping in is a common issue that can be caused by several factors.
One of the most common culprits is pedal tension, which can be adjusted using a 3mm Allen wrench.
To troubleshoot difficulty clipping in, start by checking the level of tension on your Peloton pedals and adjusting as needed.
If that doesn’t help, take a closer look at your cleat installation – make sure they are positioned correctly and tightened securely using a 4mm Allen wrench.
Remember that proper care must be taken when clipping into Peloton pedals to avoid potential ankle, foot, or leg injuries – so don’t force yourself if you are struggling to clip in.
Difficulty Clipping Out
It’s not uncommon to struggle with clipping out of Peloton pedals, especially as a beginner. This can be caused by the tension on the pedal being too tight or incorrectly installed cleats.
Another factor that affects clipping in and out is the cleat positioning. Proper alignment and attachment of cleats to Peloton shoes are crucial for smooth pedaling and easy clip-in/out.
Regular maintenance of your cycling shoes, specifically your cleats and screws, is essential for optimal performance.
Experts suggest checking their tightness once a month to avoid loose fitting or even stuck cleats that could lead to discomforts or accidents during rides.
Tips For Using Peloton Shoes Effectively
Peloton shoes are an essential part of maximizing your workout on the Peloton bike. Here are some tips to make sure you’re using them effectively:
- Make sure your cleats are properly aligned and tightened before each ride to ensure a secure fit and optimize power transfer.
- Use the correct cleat type for your pedals, either Look Delta or SPD – SL, depending on what your bike uses.
- When clipping in, start with the dominant foot at 6 o’clock position and push down through your heel until you hear a click.
- Avoid walking in cycling shoes with cleats, as it can result in injury or damage to the cleats.
- Adjust the pedal tension to your preference using a 4mm Allen wrench for optimal performance during your ride.
- Choose Peloton – compatible cycling shoes that provide comfort, breathability, and secure fitting for maximum benefits.
- Use sweat protection guards to protect your shoes from moisture and prolong their lifespan.
Conclusion
Putting on Peloton shoes is a relatively straightforward process. You first need to choose the type of Peloton shoe that works best for you. Attaching cleats involves tightening screws and positioning them correctly.
When putting on your shoes, loosen the velcro strap, slip on your foot, secure it to your preferred settings, then clip into the pedal.
If you experience any issues or discomfort while using the shoes, adjust cleat alignment or seek assistance from Peloton support for troubleshooting tips.
Sources: https://www.centuryinshoes.com
Category: Shoes